How to Monitor Website Uptime for Free
2026-07-04
The system went down at 2am. I found out at 8am when a customer emailed me. By then, it had been offline for hours. Real story about one of my projects.
This happens more often than people admit. A server hiccups, a deployment goes wrong, an SSL certificate quietly expires — and nobody knows until clients complains. The fix is straightforward: uptime monitoring. But a lot of developers and small teams skip it because it feels like one more tool to set up and pay for. The good news is you can get solid monitoring running for free in about 2 minutes.
This guide walks you through what uptime monitoring actually does, what to look for in a tool, and how to set it up without spending anything to start.
What Website Uptime Monitoring Actually Does
An uptime monitor is a service that periodically sends an HTTP request to your website — every minute, every five minutes, whatever interval you choose — and checks whether it gets a valid response back. If the site doesn't respond, or responds too slowly, the monitor fires an alert.
That's the core of it. But a few details matter:
Check frequency. A monitor that checks every 5 minutes can miss an outage that lasts 4 minutes and 30 seconds. For production apps, 1-minute checks are worth having. Most free tiers offer 5-minute intervals, which is fine for side projects and staging environments.
Check locations. Some tools only check from one server. If that server has a network issue, you get false positives. Better tools check from multiple geographic locations and only alert when several of them agree the site is down.
What counts as "down." By default, monitors treat anything other than a 2xx HTTP response as a failure. But some
apps return 200 OK even when something is broken — an API that always responds 200 but sometimes
returns {"error": "database connection failed"} will look healthy to a basic HTTP monitor. Worth knowing when you're
setting things up.
What to Look for in a Free Uptime Monitoring Tool
There are plenty of options. Here's what actually matters when you're evaluating them:
Alert channels. Email is the baseline. But if your site goes down at midnight, an email you'll read at 8am isn't very useful. Look for tools that support SMS, phone calls, or Telegram/Slack notifications — ideally without requiring a separate paid plan for one of them.
No limits on notification recipients. This catches people off guard. Some tools charge per user/seat which means adding your colleague's email or phone number to the alerts costs extra. If you want two or three people to get notified, check the pricing model before you commit.
A usable free tier. "Free" sometimes means one monitor with 30-minute check intervals and email-only alerts. That's often enough to get started, but know what you're getting.
How to Set Up Basic Uptime Monitoring in 2 Minutes!
Here is a practical walkthrough using AppChecks as an example — it gives you one free monitor with no credit card required, which is enough to cover your main site or your most critical endpoint.
Step 1: Create an account. Register, verify your email. Literally takes 30 seconds.
Step 2: Create HTTP Monitor. Enter a title, your website URL, and set the response time threshold — this is how long the site is allowed to take before it counts as a problem. The default is 500ms, but 800ms is a more realistic starting point for most sites.
Before saving, hit the Test button. AppChecks will run a live check and show you the response code and exact timing breakdown — useful to confirm the monitor is pointed at the right place and can actually reach your site. In the screenshot above, appchecks.net came back with 200 OK in 209ms.
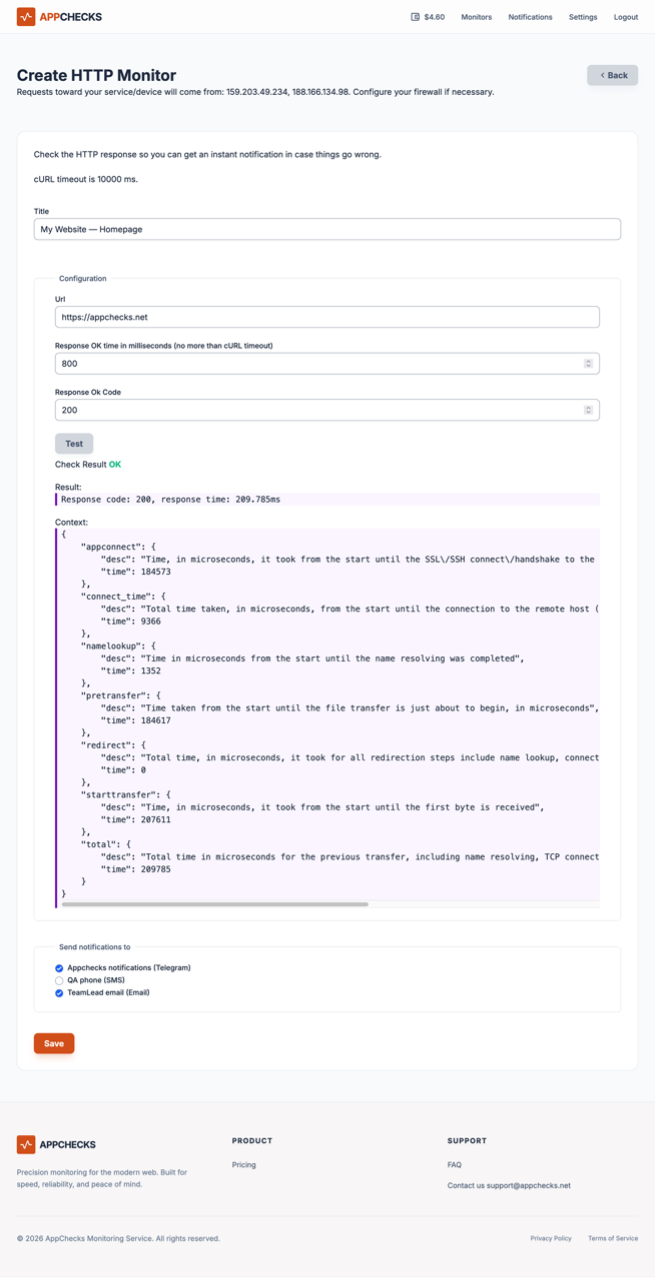
Step 3: Configure your notification channel. Then select your notification channels — you can activate several at once, for example Telegram for yourself and Email for a teammate. Telegram or Slack are great because push notifications are significantly more useful than email for time-sensitive alerts.
That's it! You now have a monitor that will ping you when your site goes down.
Beyond Basic HTTP Monitoring
Once the basics are running, there are a few other things worth setting up — especially if you run anything beyond a simple static site.
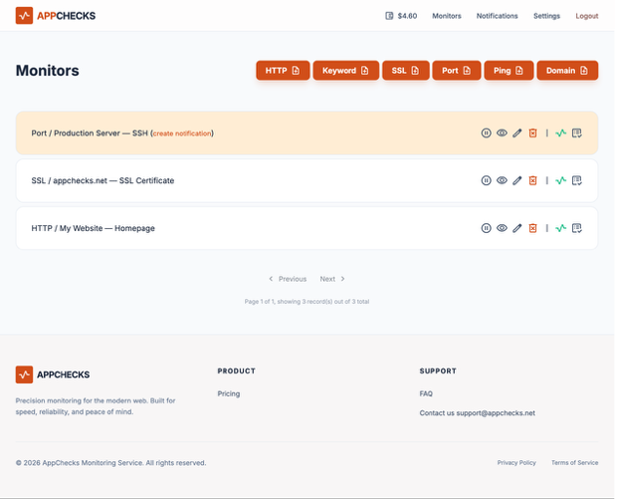 A mix of monitor types in one dashboard — HTTP, SSL, and port monitors running alongside each other.
One thing worth noticing in the screenshot: the Port monitor is highlighted in yellow. That means no notification channel is configured for it. A monitor without notifications won't be useful if something goes wrong, there's nowhere to send the alert. Always make sure each monitor has at least one active channel attached before considering it live.
SSL certificate monitoring. Certificates expire. When they do, browsers show a scary warning and visitors leave. A good SSL monitor checks your certificate and alerts you before it expires — ideally 30, 10, and 1 day out. Set it once and forget about it until you get the reminder.
Port monitoring. If you run a mail server, for example, or any other service that listens on a specific port, you can monitor whether that port is open and responding. This is useful both for catching outages and for security — you can set up an alert if a port that shouldn't be public-facing suddenly becomes accessible.
API endpoint monitoring. If your app has an API, basic HTTP monitoring will only tell you whether the endpoint responds at all. For anything more nuanced — like checking that a response contains a specific field or doesn't contain an error message — you need keyword monitoring. You set a word or string to look for (or look for the absence of), and get alerted if the response doesn't match.
For example: if your API always returns HTTP 200 but sometimes includes "status": "error" in the response body, a
keyword monitor can catch that. An HTTP monitor would not.
Common Mistakes to Avoid
Only monitoring your homepage. Your homepage might be fine while your checkout flow or API is broken. Monitor the URLs that matter most to your users, not just the ones that are easiest to check.
Alert fatigue. If you set thresholds too tight, you'll get alerts constantly and start ignoring them. Tune your response time thresholds based on actual baseline performance, and make sure your check interval isn't so short that brief network blips trigger false positives.
Not having a backup notification method. Email is easy to miss. Configure at least one real-time channel — Telegram, Slack, or SMS — for anything you'd consider critical. Save phone calls for emergencies that would need to wake you up at 3am.
Forgetting to test your alerts. Set up monitoring, then deliberately trigger it. Make sure the right people get notified through the right channels. Don't find out your alerts are broken during an actual outage.
Conclusion
Uptime monitoring doesn't have to be complicated or expensive. The core setup — an HTTP monitor pointed at your main URL, with email and at least one real-time notification channel — takes less time to configure than writing this paragraph.
Start with your most important URL. Add SSL monitoring. Then expand from there as you get a better sense of what your specific setup actually needs to be monitored.